Tuesday 18 December 2018

V Wall Nambucca Heads for Colour Blast Australia


 Hi there, this is my last post for 2018. I had prepared this one early however nothing goes to plan this time of year... I guess that's why its called the Silly Season... 
This was of me and my boys when we were on holidays earlier this year at Nambucca Heads.. Just some shenanigans on the V Wall. I still cant believe how much they have grown.. They were once babies riding trikes up and down this strip.. 
It truly is my happy place. 
 

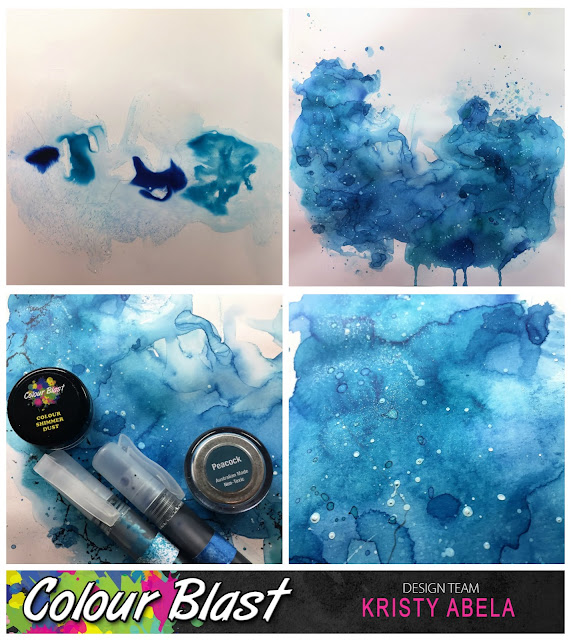
I started out with a piece of glossy cardstock. I love using this kind as it gives a resist to the water colour without changing the properties of it like gesso can. I liberally put some water on the page with a paintbrush. I then sprayed some Colour Shimmer Dust in Cobalt and Peacock from my Home-made misters.. I dried in between layers so I could get the pooling effect to look like water. I splattered some extra colour with the still wet brush and also with my Colour Blast Gesso in white.. It was patiently waiting to be used on my chipboard.

  
Once that was dried I added some stamping to further enhance the water effect using bubbles and a crackle texture stamp. to finish the background I added some shimmery transparent bubbles with my Colour Paste in Snow.


Check out the sparkle and layers.. I almost felt like I was looking into a stream. 


Time to work on my embellishments. I used a sponge to apply my Colour Blast Gesso to the chipboard. I deliberately left peaks on there as I wanted to create some texture. Using my Colour Artist Inks in Barley, Walnut and Rust. I put down on the mat puddles of each and using tweezers dipped them in and dried in between. the colour will reactivate every time so you need to manipulate it to suit. I wanted to highlight the ridges so I used my Colour Shimmer Pot in Bling to touch on a few areas on the shells, I rubbed some onto my finger tip and left it tacky and almost dry and lightly rubbed it onto the stick. I wanted to give it the same effect as what I would get using wax.


I repeated the same process with the Seagulls and added a little bit of Leather from my Colour Shimmer Pot


 You can see the definition below. 
I love that it looked so natural in the end. 


To finish off my photos I tried to define them by running the edges into some of the Colour Shimmer Dust puddles in Peacock and Cobalt. I didn't like the straight edge it was giving me and I didn't want to get ink on my pictures. I grabbed an eye dropper and created a  messy edge. I used Peacock first and then Cobalt, but still wasn't happy with the definition. I then used some Midnight to darken the edge - I was much lighter handed this time round because I didn't want to lose my blues. 

 
Once done, I ran some wire across my page and threaded some fish charms I had. Layered some textured die cuts  and some cheesecloth to create a net. I added some Art stones in Mini and Regular with some beads to some gel medium and dragged them across the page.
 

 Thanks for looking and don't forget to tag me if you found some inspiration here on the Colour Blast Creative Corner in Facebook.

Abela Artistry


Wednesday 5 December 2018

Angel Dreaming - Art and Soul Studio

Hi there Soul Sisters...
My turn up on the blog today to share with you some inspiration.  Mixed Media canvas for you playing with some metallic paints and Chipboard. I have been eyeing off these Dusty Attic wings for a while now and wanted to showcase them in a project. 


Here is my process.. 
I started out adhering the chipboard and stones on the canvas. I also used some lace for extra texture in the background and painted it all in white gesso.


I began adding colour to the piece by layering in concentric circles moving inwards. I went from lightest to darkest and being more frugal in my applications as the deepened. 


I made sure to dilute the colour with water on the brush and applied it directly. I then sprayed a mist of water to get it too run into the deeper layers. I avoided adding colour to the wings as I wanted to make them a focal point. 


I made sure to dilute the colour with water on the brush and applied it directly. I then sprayed a mist of water to get it too run into the deeper layers. 


Once done I dry brushed some white gesso over the texture to push the colour deeper into the background.


I added some crackle paste... and a little rub of wax onto my stones.


Coloured some Cheesecloth. 


Popped my focal point on top of the cheesecloth and added some string in a halo. 


Used some Glass Glitter, Prills and Beads on my flowers. I wasn't really happy with the intensity of the embossing powder so I muted the colour with some wax. 


And a little bit of black archival ink with a blending tool over the textures.. and a bit of a dry brush with some gold paint over the chipboard. Some art stones to finish off my focal point. Here's a close up of the texture with the fabric.. Thanks for looking. 


Abela Artistry

Product list:
Lindys Stamp Gang - Bodacious Blush
Art Stones
Wax
Flowers 49 & Market - Potpourri Cerise and Hazelnut
Lace 
Cheesecloth

Tuesday 4 December 2018

Right Now! for Colour Blast Australia

Hi friends, here's a new inspiration for you using Colour Blast Australia products. This photo was taken At Scenic World - Katoomba. We took all the boys on an adventure. Shortly after this it poured and we all got soaked!!
 Here are some closer looks...


 To create this layout I have a process by where I create my focal point first. For this one I found some papers and created a matt.


 I found some Fab Dusty Attic Chipboard from my new Design Team kit and added some crackle paste. While it was still wet I added Colour Artist Ink in Walnut to colour the paste, not to sit on top of it. I then added a touch of Art Alchemy wax to highlight the crackle.


 Using Colour Paste in Leather I used a stencil to create some embellishments. I deliberately over heated the paste to get a lovely texture on the moths. I also added some Colour Embossing Powder in Stormy Sky to the title. When I layed it out I decided that it was too dark and them put a layer of Sunshine on instead. The black base gave the Colour Embossing Powder a complete golden shimmer.


 Once I was comfortable with where my embellishments and focal point were going to go I marked out in pencil and removed them to work on my background. For this process I coloured some Colour Blast Heavy Gesso White with Colour Artist Ink, Barley and used my pallet knife to apply. Once I had enough I added Colour Artist Ink in Lime to the remaining mixture to vary the shade and add a another layer. Once this was dry I added some splatters with Colour Artist Ink - Walnut... Why not - It was still sitting there.

 At that point I realised I had a Grungy effect to the layout now and then added some stamping with Archival Ink to add to that feel. I stuck down the Picture and embellishments and then used my Colour Shimmer Brush Marker to add a bit of sparkle to my flowers.
Hope you enjoyed the process... Check into Colour Blast Creative Corner and see what the other girls are up too...  

Ciao for Now
Kristy Abela

Tuesday 20 November 2018

In My Heart for Colour Blast Australia


I love these pic's of me and my Husband hamming it up for the camera at our Fiji wedding... He will always be 'In my heart'...
Anyway sentiment aside, I really wanted to have a play using the Colour Artist Inks and Colour Shimmer dusts to paint some pretty flowers. The rest of the project evolved from there.. 


I put the smallest amount into a palette and used a water brush to apply. I used a combination of Colour Artist Inks Grass, Cranberry, Sunset, Barley, Bordeaux, and Rust. I also used Colour Shimmer Dust Peacock and Duke. I created the purple quite by accident when I didn't wash out my blue properly...
I really got to play with pooling the colours as well as layering them.


Even if you don't have a project in mind its a really good way to get to know your product. Look at that Bouquet!!


I thought initially that I wanted to have a lot of negative space to showcase my flowers... 
Hmm, who was I kidding I don't do negative space!! 
So while this looked like it was going to showcase only the Colour Pastes in Envy, Singing the Blues and Lovely Lilac.. That didn't last long.


I used my Colour Spray in Violet hoping to get a vibrant background, however it paled with the use of my mister to create flow and also created some serious over spray on where I was hoping to attempt negative space... So in true Mixed Media Fashion I added another layer...
I grabbed my water mister and added moisture to the center of the page. I added Colour Spray in Caribbean and sprayed quite generously to create those awesome run lines... To cover up the over spray I brushed the Violet Colour Spray around the edges and created some fantastic watery effects... 


I sprayed a strip of Colour Spray in Road Base on my mat and dragged the edges of the layout through it. As I turned the page the colour ran into the project... I added some splatters in the same Road Base and then did the same with some Colour Blast Heavy Gesso White. A little bit of stamping with archival ink and the background was done. 


Here I added a layer of crackle paste and used my Colour Spray in Caribbean and my Colour Artist Ink in Cider to add some colour. I Painted some Chipboard with Colour Blast Heavy Gesso Black, distressed some Cheesecloth and then collaged the embellishments. Check out the close ups below...


Hope you enjoyed today's inspiration.  Make sure you pop up your Colour Play in out Facebook page Colour Blast Creative Corner
Thanks For looking!

Abela Artistry


Saturday 10 November 2018

Remember This - A&S Moodboard Challenge - November 2018

Welcome, here is my Moodboard inspiration... 
This one is for my bestie... Her colours are Black and red.. always have been and always will... We went out for my birthday to the theater to watch the Cuban Ballet. So therefore.. Remember this was ever so appropriate! Enjoy the close ups!!


Here is our Mood Board.. Let me see what inspiration you get from it...


Mood Board Challenge Rules

Please use our mood board as inspiration to create an art journal page, a card or a scrapbooking layout. Use the mood board however you want but you must add a butterfly on your project.

As these challenges are sponsored by Art and Soul Studio please make sure that you use at least one product that is available from the store.

There are 3 x $50 vouchers up for grabs!! One will be awarded for scrapbooking layouts, one for cards and one for mixed media/art journaling.

You can enter an art journal page, a card and a layout but you cannot win all three.

You have until the 11:59pm on the 30th November to enter and then the design team will vote to determine the lucky winners.


Please note that the vouchers can only be won by residents of Australia but if you are from overseas and win the challenge you will be offered a guest design team spot.

Product List
Micro beads
Flowers - Kaiser